Showing posts with label Terrain. Show all posts

10 July, 2025

Stargate Project: The Stargate

 You can't have a Stargate game without a Stargate.  I have seen many versions over the years, including one where you can insert a cellphone to get the gate effect.  I ran across this one on eBay while buying a 3d-printed paint holder. The center is removable, but fits so tightly that I try to move it as little as possible to avoid scratching the paint.  I painted the event horizon with successively lighter shades of blue in smaller areas with some silver mixed in the center.

It didn't come with a DHD, the device used to activate the gate.  I bought this 3D-printed one on Etsy from Majestic Miniatures.  They also make some gate versions.  I think it would be fun to run a scenario with 2 boards and a stargate on each one so I may buy one from them in the future.

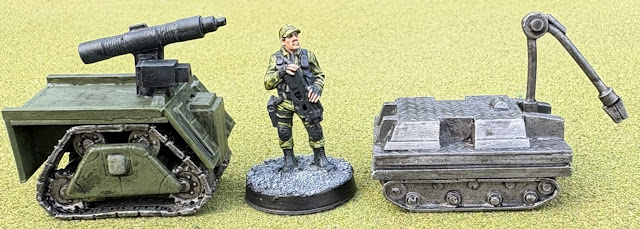
I have 2 versions of the MALP, the robotic vehicles used to perform recon and carry equipment.  The one on the left is a scratchbuilt version that I bought secondhand, repainted, and added a missile.  The tracks are metal and the rest is made of card.  The missile came with the right-hand version from Ainsty Castings which is made of resin.

Last are two firepits from Bad Goblin Games who have a variety of cool terrain accessories.  I am going to use them as temple fires in the Great Temple from my previous post.  They come with a small light and battery, though the lights are not on in these photos.  I gave the flames a red wash to tone down the orange.


A photo to show the scale.  Off to explore the universe!


07 July, 2025

Stargate Project: The Great Temple

With all the other terrain items painted, my attention turned to a large building that I bought at Siege of Augusta 2025 from Garrison 3D.  It has a diameter of 12 inches/30.5 cm and is 9 inches/22.9 cm tall.  When I first saw it I was instantly reminded of a classical temple or building such as the Pantheon in Rome.  It is a 3D print and consisted of the base and a separate dome.  Each of the sections was made from four pieces that had been glued together.

It is intended to be a scifi building as there are two small accessories on the exterior that appear to be electronic systems.  I painted them the same as the surrounding area to make them less noticeable.  They fit the theme given Stargate's use of advanced technology added to historical architecture.

The method I used was first to spray prime several coats of Krylon gray primer.  Next I decided that I wanted to fill the seams between the four sections.  They were partly filled by the original assembly and the primer but I wanted to get rid of the remaining gaps.  An application of superglue gel smoothed by a toothpick did the trick.

I added two coats of brushed on off-white craft paint with a very large brush.  Then I applied a thin wash of gray craft paint to darken the white. I had used red on some of the previous buildings and columns, so used Army Painter Dragon Red on different areas until it looked right to me.  After looking at it for a day I thought it needed another color, so painted some more areas gold.  I think there is enough color to break up the white.

I thought the white was still too bright.  So I applied watered-down Apothecary White GW contrast paint.  That darkened it enough that I was satisfied.  Finally, I sprayed it with two coats of Krylon Matte Varnish.  I am pleased with how it turned out.  It will serve as a good central piece on the table and I have several items that I plan on using in the interior during games.

From the front - a Roman senator speaks to the crowd (28mm Footsore miniature).

An overhead shot with the dome removed.  Plenty of space for skirmish action.

From the rear

Overhead with the dome on.

One last look inside


30 May, 2025

Stargate Project: Columns, Obelisks, & Statues

This is the second post covering terrain pieces for my Stargate project. It includes the smaller items. You can see the larger ones hereA nice benefit is that all of these pieces can be used in historical games as well.

I painted these with the same method as the buildings.  I started by spray priming them with two coats of Army Painter Skeleton Bone. Next was an application of Skeleton Bone with a large brush, to cover any areas the spray didn't fully cover and to give a nice even base. Some of the pieces had details that I painted individually.  Then I gave them a wash with watered down Army Painter Soft Tone. This shaded in the hieroglyphs and other details. The final step was two coats of Krylon Matte Varnish.

I bought these four 3D printed columns from Miniature Building Authority as a set. The detail is excellent and each side has different designs. I have them arranged so that you can see each of the sides. The miniature is a 28mm Roman from Footsore's Gangs of Rome range.

A large obelisk from Armorcast with a 28mm Macedonian from Aventine for scale. All the Armorcast pieces have a large variety of hieroglyphs on each side and are nicely done. I have been tempted to go back and paint the larger hieroglyphs similar to how I did some of the buildings in my last post, but have not had the time.  It may be a future improvement.

Two more pieces from Armorcast, (l) a ruined obelisk and (r) a ruined column.  I used the ruined column as a test piece when initially working out the paint scheme.  

Two statues devoted to the Egyptian god Set. The statue on the left is from Dragon Bait Miniatures, whose products will figure prominently in a future post on this project. I have dubbed the jewel on top 'The Eye of Set'. The statue on the right is from Miniature Building Authority and is a 3D print.

17 May, 2025

Stargate Project: Terrain

An important part of my Stargate project is the terrain. The original movie featured Egyptian buildings in a desert setting, while the tv show retained the buildings but took place on a variety of worlds.  Most of those worlds bear a suspicious resemblance to the Pacific Northwest, since it was filmed in British Columbia.  While the show broadened out its settings to other historical eras from classical to medieval, I wanted my project to focus on the original Egyptian style.  So a set of Ancient Egyptian terrain pieces was required.  A bonus is that all of these pieces can be used in historical games as well.

In October 2024 while visiting my friend Mike in Ohio, he gave me a large box of Ancient Egyptian pieces that he had acquired over a decade ago from another gamer and didn't have any plans for.  It was all from the Armorcast line.  In early 2025 I started painting them.  My goal was the sandstone look of Ancient Egyptian monuments we are all familiar with.  I normally paint buildings one at a time, but since I was going to paint them all in the same style, I did two large batches.  

I started by spray priming them with two coats of Army Painter Skeleton Bone.  Next was an application of Skeleton Bone with a large brush, to cover any areas the spray didn't fully cover and to give a nice even base.  Some of the pieces had details that I painted individually.  Then I gave them a wash with watered down Army Painter Soft Tone.  This shaded in the reliefs and other details.  The final step was two coats of Krylon Matte Varnish.

This post has all the larger pieces, there will be a second post with the smaller items.  

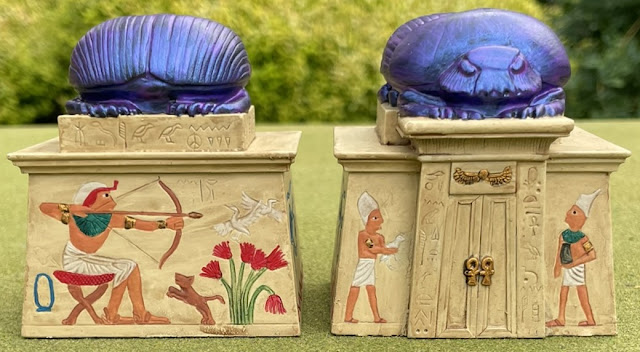
First up are my favorites and the most detailed; two identical small buildings with reliefs on each side and a large scarab beetle on top  The reliefs were large enough for the detail to be easily visible when painted in the style that Egyptian temples were decorated.  For the scarabs I wanted to do something different.  My friend Mike has experimented with color-shifting paints and after a discussion with him, I bought a bottle of Folk Art Purple Flash.  You have to paint it over a black base.  I tried using a blue metallic base on one but it did't turn out well so I started over with black.  The color-shift paint goes on as a transparent purple and dries as a purple-blue that does appear different as you look from different angles.  I like the way they turned out.

Each side is different: the one on the left shows the rear and the one on the right shows the front.

Right and left sides

The top with a 28mm Macedonian from Aventine for scale.

One more look at the front.

Two small pyramids.  What treasures are beyond those doors? The miniature is a 28mm Egyptian from Footsore's Gangs of Rome range.  

Two statues of Anubis.  I used ancient representations of Anubis as a guide, so began with the same Skeleton Bone base, then applied two coats of GW Black Templar contrast paint, and added the gold details last.

The last of the Armorcast pieces.  It came in two sections, the base and the vertical obelisk.  The base section is very busy, with an eagle (or falcon?) at each corner.  The wash didn't turn out as well on it but I'm sure it will look fine on the table.

I acquired 7 identical large Egyptian statues at the 2025 Siege of Augusta convention from Garrison 3D out of Florida.  I recall that they were left over from a special project so not part of their normal product line.  They are 6.25 inches/5.9 cm tall and will certainly add to the atmosphere.  I am not sure what material they are made of, they aren't the usual 3d prints.  The surface is very rough and a bit pockmarked and they soaked up a lot of paint.  I skipped the soft tone wash on these after I tested a small area on one and couldn't tell much difference.  You can see that they tower over the 28mm miniature.


08 February, 2025

Purchases at Siege of Augusta

 I started off 2025 as I usually do by attending the Siege of Augusta convention in Augusta, GA.  This year, along with my 2 high schoolers, my friends Mike and Jenny drove down from Ohio to attend.

I am planning on running a Stargate game later this year and was on the lookout for some more terrain pieces.  There was a new vendor with a variety of 3d printed items, Garrison 3D from Florida.  He had some leftover Egyptian statues he wanted to get rid of, so I picked up all 7 of them for $10.  They are 6" tall so will look suitably imposing on the table.


Garrison 3D also had a large structure, diameter 12", that reminded me of a classical temple similar to the Pantheon in Rome.  I kept eying it all weekend and eventually gave in and bought it.  I am still working out a paint scheme but it will make a good central objective.


I also wanted to find some accessories for the temple.  Miniature Building Authority had some Egyptian columns and a snake statue that fit the bill.

Bad Goblin has a line of different fire items using LEDs, and I got 2 of their fire pits for $5 each.  You can see some lit up on my friend Mike's blog Lead Legionaries.  Bad Goblin have a great line of terrain for their upcoming Trailer Park Warlords of the Apocalypse game.  They also gave my daughter one of their miniatures after she played in one of their demo games, which is currently on my painting table.

I had a find in the Saturday morning flea market with 2 boxes of Perry Hundred Years War English for $20 each.  This was great timing as my copy of the new Age of Chivalry book for Saga waiting for me whrn I got home after the convention.  I've already started painting 24 of them.

I'm not sure if I will make any other conventions before Historicon, but Siege was a good start to the year.

12 March, 2023

28mm Modern/Post-Apocalypse

This week I took photos of two batches of miniatures I painted in late 2022 for my modern/post-apocalypse games.  They are all from Hasslefree and were purchased in 2021/2022.  These are the last miniatures that I have from them, so I can move on to some other sections of the lead pile.  One thing I really like about Hasslefree is that they portray different body types (male/female, height, weight) while also making them suitable for handling in games.  I have bought female miniatures in the past from other manufacturers that were so thin and fragile that they were unusable.

Photos were taken on a warm March morning.  During the first attempt, there was a lot of pollen in the air and it got everywhere.  After a thorough brushing-off I tried again the next day.  The descriptions are from left to right and the names are from the Hasslefree website.  Paints used were a mix of craft paints, Vallejo, P3, Ral Partha, Army Painter, and GW.

Every post-apocalypse movie needs a kid.  Or three.  Peter, Katie, and Young Amoy are doing quite well even though civilization has collapsed.  The younger two have fashioned weapons out of everyday objects, while Amoy wields the family sword.


Punks Joanne and Joe are ready for some mayhem.  They would fit well in a game of my friend Mike's rules Mean Streets, which cover gang warfare.  


Jim is an army veteran/urban revolutionary.  I really like the pose of Taylor mini and when I saw it on sale I bought it right away.


Foxtrot comes with an alternate head and arms.  The other head is a Imperator Furiosa look-alike from Mad Max:Fury Road.  I already have one of those from another company so I used the gas mask head.  Pulse is one of my favorite Hasslefree sculpts and is usable in various modern settings.  These are both taller figures.


Shotgun-wielding Madge and office worker Earl are ready for any trouble that comes their way.  Looters beware!


Police officer Ken comes with alternate arms holding a shotgun.  Firefighter Levon appears to have learned that an ax is an effective anti-zombie weapon.  These two are also taller figures.


Il Capello bears a strong resemblance to Walter White from the tv show Breaking Bad.  Police officer Nick clearly means business.  He comes with several arm options.


Jess is a former hockey player.  The last time I was painting zombies I missed Zombie Ray so I  painted him with this batch.  I like the half flesh/half skull look.  HF also make a living version.


Is this illegal toxic waste dump where the zombie outbreak started?  I do not know the manufacturer of this resin terrain piece as I took it out of the package several years ago, primed it, and promptly set it aside and forgot about it until recently.


All 17 miniatures together.


Four of our chickens.  They surrounded me while I was taking the photos because they were hungry.  I promised them food and internet fame.