Showing posts with label Buildings. Show all posts

07 July, 2025

Stargate Project: The Great Temple

With all the other terrain items painted, my attention turned to a large building that I bought at Siege of Augusta 2025 from Garrison 3D.  It has a diameter of 12 inches/30.5 cm and is 9 inches/22.9 cm tall.  When I first saw it I was instantly reminded of a classical temple or building such as the Pantheon in Rome.  It is a 3D print and consisted of the base and a separate dome.  Each of the sections was made from four pieces that had been glued together.

It is intended to be a scifi building as there are two small accessories on the exterior that appear to be electronic systems.  I painted them the same as the surrounding area to make them less noticeable.  They fit the theme given Stargate's use of advanced technology added to historical architecture.

The method I used was first to spray prime several coats of Krylon gray primer.  Next I decided that I wanted to fill the seams between the four sections.  They were partly filled by the original assembly and the primer but I wanted to get rid of the remaining gaps.  An application of superglue gel smoothed by a toothpick did the trick.

I added two coats of brushed on off-white craft paint with a very large brush.  Then I applied a thin wash of gray craft paint to darken the white. I had used red on some of the previous buildings and columns, so used Army Painter Dragon Red on different areas until it looked right to me.  After looking at it for a day I thought it needed another color, so painted some more areas gold.  I think there is enough color to break up the white.

I thought the white was still too bright.  So I applied watered-down Apothecary White GW contrast paint.  That darkened it enough that I was satisfied.  Finally, I sprayed it with two coats of Krylon Matte Varnish.  I am pleased with how it turned out.  It will serve as a good central piece on the table and I have several items that I plan on using in the interior during games.

From the front - a Roman senator speaks to the crowd (28mm Footsore miniature).

An overhead shot with the dome removed.  Plenty of space for skirmish action.

From the rear

Overhead with the dome on.

One last look inside


17 May, 2025

Stargate Project: Terrain

An important part of my Stargate project is the terrain. The original movie featured Egyptian buildings in a desert setting, while the tv show retained the buildings but took place on a variety of worlds.  Most of those worlds bear a suspicious resemblance to the Pacific Northwest, since it was filmed in British Columbia.  While the show broadened out its settings to other historical eras from classical to medieval, I wanted my project to focus on the original Egyptian style.  So a set of Ancient Egyptian terrain pieces was required.  A bonus is that all of these pieces can be used in historical games as well.

In October 2024 while visiting my friend Mike in Ohio, he gave me a large box of Ancient Egyptian pieces that he had acquired over a decade ago from another gamer and didn't have any plans for.  It was all from the Armorcast line.  In early 2025 I started painting them.  My goal was the sandstone look of Ancient Egyptian monuments we are all familiar with.  I normally paint buildings one at a time, but since I was going to paint them all in the same style, I did two large batches.  

I started by spray priming them with two coats of Army Painter Skeleton Bone.  Next was an application of Skeleton Bone with a large brush, to cover any areas the spray didn't fully cover and to give a nice even base.  Some of the pieces had details that I painted individually.  Then I gave them a wash with watered down Army Painter Soft Tone.  This shaded in the reliefs and other details.  The final step was two coats of Krylon Matte Varnish.

This post has all the larger pieces, there will be a second post with the smaller items.  

First up are my favorites and the most detailed; two identical small buildings with reliefs on each side and a large scarab beetle on top  The reliefs were large enough for the detail to be easily visible when painted in the style that Egyptian temples were decorated.  For the scarabs I wanted to do something different.  My friend Mike has experimented with color-shifting paints and after a discussion with him, I bought a bottle of Folk Art Purple Flash.  You have to paint it over a black base.  I tried using a blue metallic base on one but it did't turn out well so I started over with black.  The color-shift paint goes on as a transparent purple and dries as a purple-blue that does appear different as you look from different angles.  I like the way they turned out.

Each side is different: the one on the left shows the rear and the one on the right shows the front.

Right and left sides

The top with a 28mm Macedonian from Aventine for scale.

One more look at the front.

Two small pyramids.  What treasures are beyond those doors? The miniature is a 28mm Egyptian from Footsore's Gangs of Rome range.  

Two statues of Anubis.  I used ancient representations of Anubis as a guide, so began with the same Skeleton Bone base, then applied two coats of GW Black Templar contrast paint, and added the gold details last.

The last of the Armorcast pieces.  It came in two sections, the base and the vertical obelisk.  The base section is very busy, with an eagle (or falcon?) at each corner.  The wash didn't turn out as well on it but I'm sure it will look fine on the table.

I acquired 7 identical large Egyptian statues at the 2025 Siege of Augusta convention from Garrison 3D out of Florida.  I recall that they were left over from a special project so not part of their normal product line.  They are 6.25 inches/5.9 cm tall and will certainly add to the atmosphere.  I am not sure what material they are made of, they aren't the usual 3d prints.  The surface is very rough and a bit pockmarked and they soaked up a lot of paint.  I skipped the soft tone wash on these after I tested a small area on one and couldn't tell much difference.  You can see that they tower over the 28mm miniature.


02 March, 2021

28mm Modern Buildings from 4Ground

During the Black Friday sales in early December, I was browsing Noble Knight's website looking for things I could add to an order I was making.  I happened across buildings from 4Ground that looked interesting.  I went to the 4Ground website to check if they had more pictures and learned that they had more buildings in the range and were also having a sale.  I bought the Construction Site Tower Block Bundle (all 4 buildings in the range at a discount plus a pack of extra wall panels) directly from 4Ground and soon had packages from both 4Ground and Noble Knight.

4Ground MDF kits come prepainted.  My previous experience with 4Ground buildings was limited to one building I bought at a flea market and assembled years ago.  When I assembled it I did not have a good experience, mainly due to some very fiddly parts for the windows and the plastic meant to represent window glass.  I was willing to give them another try and thought that any issues I might have during assembly would be mitigated by the fact that they were buildings still under construction.  In addition to the construction set I also bought a French butcher shop, two billboards and two vending machines.  None of them appeared to have any of the components that had caused me problems previously.

The appeal of these kits was that I could use them in both a modern cityscape and in a post-apocalypse setting.  As my storage space for buildings becomes scarcer I am having to choose new items carefully and am only trying to buy those that that can serve in multiple settings.  Also, I don't have anything else like them.

 I assembled the first of the Construction Site buildings on the evening of January 1st while watching Ohio State play (American) football and did one per evening for the next three days.  I am very happy with the results.  I think these handle stairs better than any other MDF kits I have, both for ease of assembly and the final look.  The one minor issue I had was with some of the internal walls; I had to cut some of them down a bit in order for the next floor to sit properly on top of the internal walls and outer beams.  I didn't use any of the extra wall panels in order keep more access to the interior.

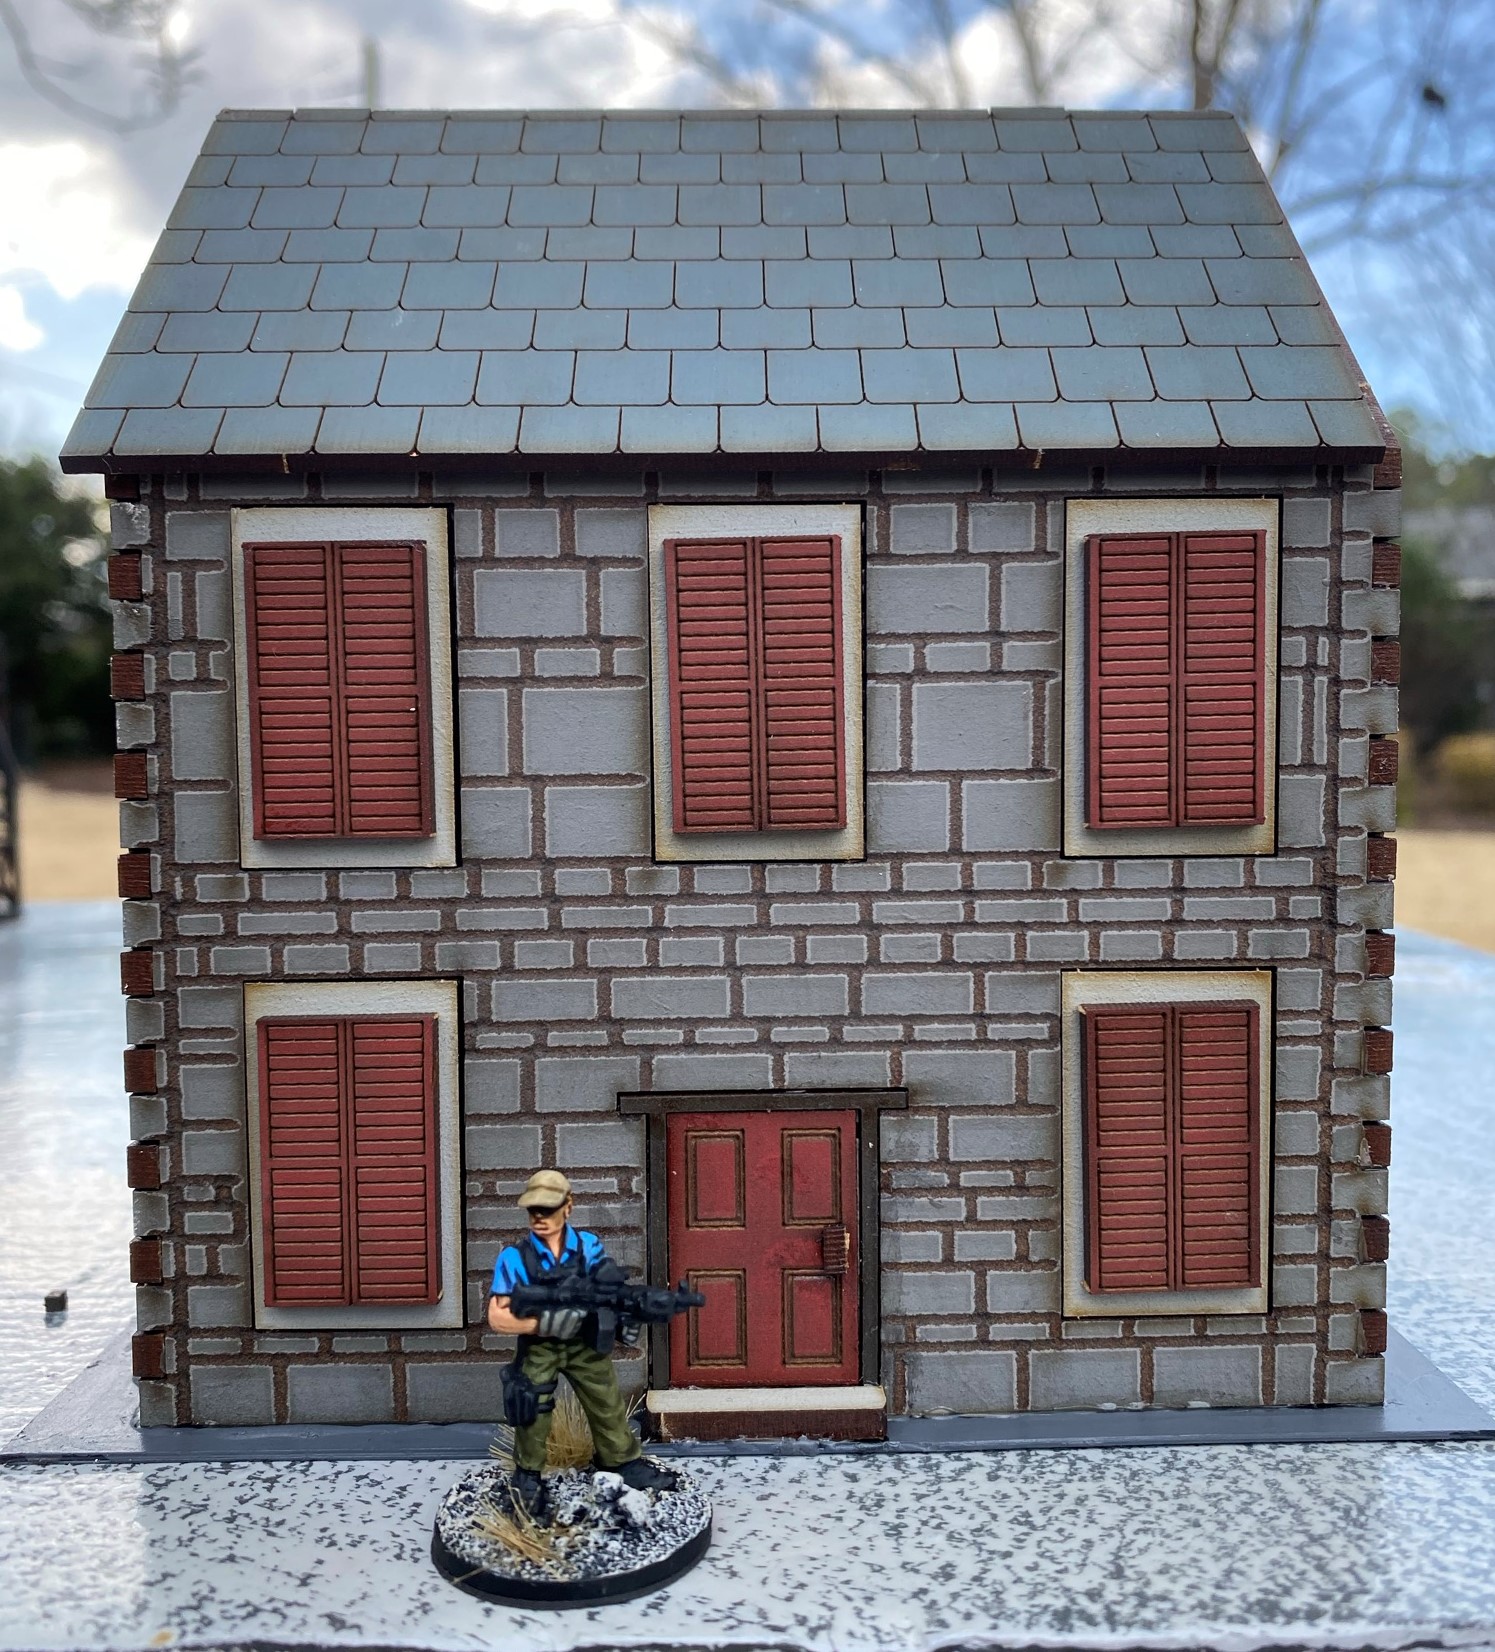
The bases are all 14x14 cm or 5.5 inches.  There were several ladders included but I did not use them in the photos.  The miniatures included to show the scale are some 28mm military contractors from Eureka Minatures and a Hasslefree Miniatures 28mm Kat (HFA004, inspired by Selene from the Underworld movies).  As always, click on the photos for larger versions.

Construction Site 2-Story Tower Block


Construction Site L-Shaped Tower Block


Construction Site 3-Story Tower Block


The Construction Site Tower Block Booster can be used on its own or to give one of the other buildings additional height.


Laying out all 4 buildings in a row gives me 56 cm / 22 inches of terrain, which is a great addition to my game layouts.


A more vertical setup with the booster on the right under the L-Shaped Block. 


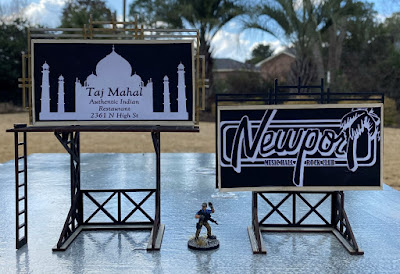
I also got two billboards for my cityscape: (l) Large Billboard with Platform, (r) Billboard.  The smaller one will fit nicely on top of a building.  They come with a selection of premade signs.  I made my own signs to continue my practice of using business names from my hometown of Columbus, Ohio.  Most of the time I pick places around the Ohio State University campus during the 1980s-1990s.  In this case the Newport Music Hall, where I went many times for concerts and is still around.  The Taj Mahal restaurant now exists under the name New Taj Mahal for reasons unknown to me.  Both of these were very easy to assemble.


The Butchers Shop kit was very inexpensive.  The reason is that it does not have a detailed interior or a base.  The instructions also have the roof glued on.  I like to be able to use the interiors of my buildings, so I added a base made of black styrene and gave the inside a quick coat of off-white craft paint and added a floor using scrapbook paper.  It was easy to glue some of the triangle-shaped scrap MDF pieces to the underside of the roof to give it more stability.  The kit includes a 'Boucherie' sign, but as noted above, I like to have building signs from my hometown of Columbus, Ohio.  So after some consultation with my Columbus gaming friends , I decided to make a Carfagna's sign in honor of an Italian market that I used to visit with my parents and is still open.  This kit also included a red and white awning that I did not use.


Even mercenaries get hungry!  These Grey Vending Machines come as a set of two.  Included with the kit are detailed paper covers with a variety of drinks and snacks.  Very easy to put together.


04 April, 2016

Dark Age Buildings

After painting multiple armies for Saga, I decided I needed some 25mm Dark Age buildings in my collection.  Enter Acheson Creations.  They produce a large range of resin buildings and terrain for various periods.  These are all from their Medieval Range.  They have a good amount of detail, are easy to paint, and to top it off are inexpensive.  I've listed the current prices below, but they were even cheaper when I bought them several years ago.  I painted them in 2014, at the same time as the Acheson bridge I posted pictures of in October 2014.

The 4 buildings in this post all have removable roofs.  I don't remember if all of their Dark Age buildings have them, but I like being able to place miniatures inside.

The first step was preparing the buildings.  I ran them through the dishwasher (gentle cycle, top rack) to remove any mold release agent.  Then I spray-painted them black.  Next I used a brush to paint black any spots that didn't get covered sufficiently.

On the left is the Timbered Saxon House ($16); on the right is the Thatched Wattle and Mud House ($15).  For the Saxon House, I drybushed the entire building twice with Vallejo German Camo Medium Brown, then did a lighter drybrush with Howard Hues Colonial Khaki on the wood areas.  For the thatch, after the brown, I drybrushed Ral Partha/Iron Wind Dun, then Musket Miniatures New Thatch.  I had bought that color years before but never used it until this project.  It is fitting that I finally used it for thatched roofs.

For the Thatched Wattle and Mud House, the wattled areas got a medium brown drybrush.  I painted the rest with several thin coats of Howard Hues Colonial Khaki, then a drybrush of off-white.  The thatch was done as described above.


I'm not sure which building this is as not all of the Acheson buildings have pictures on their website.  It was painted using the same techniques as the previous buildings, with the addition of drybrushing the stone foundation and steps with Ceramcoat Charcoal Grey, Ceramcoat Storm Grey and Vallejo Game Color Cold Grey.  This building has one difference to the others; it does not have an interior floor.  It doesn't impact gameplay though.


Last is the Viking Log Longhouse ($14.50).  I modified this one using an idea from my friend Mike Demana, terrain builder extraordinare.  He has many cool projects on his blog at http://leadlegionaries.blogspot.com/

I added dragon heads to the ends of the crossbeams on each side of the hall.  I bought a 'Toob' of plastic dragons at Hobby Lobby, picked out 4 I liked, then cut the heads off.  I used a pin vice to drill holes in the base of each head and in each beam.  I used brass wire and superglue to attach the heads to the beams, then painted everything as described for the previous buildings.  I think the dragon heads add a lot of character to the building and give it a Viking feel.


21 March, 2014

Game Report - Doctor Who


Here are some pictures of the Doctor Who Miniatures Game scenario I ran at Siege of Augusta on 18 January, 2014.  All were taken with my iPad.  I used a modified version of the 'Lock, Stock & 2 Smoking Daleks' scenario written by Crooked Dice (creators of the DWMG rules).  It is set during the last 2 episodes of David Tennant's first season as the 10th Doctor, 'Army of Ghosts' and 'Doomsday' while the Daleks, Cybermen and Torchwood are engaged in a life-or-death struggle for London.

Below is the table setup.  It was my first attempt at a city game board.  There are a variety of buildings, most of which were acquired for use in this game.  I used a mix of manufacturers including Demo's Laser-Cut Designs, Ainsty and Paper Terrain.  For the base, I used 6 2x2 foot pink insulation boards with a coat of primer, 2 coats of medium gray and 1 heavy wetbrush of light gray.  They turned out a bit lighter than I wanted, so I am considering how to darken them a bit.  There are styrene strips with a sidewalk pattern lining the streets and painted the same light grey but they don't show up well in the pictures.  Perhaps I will try an ink wash so the pattern is more distinct.  The TARDIS and the Doctor are visible at the top left.


An early game picture.  The Cybermen have set up their machines to convert humans into Cybermen in the 3-story factory in the middle of the board with the antenna on top.  The 2 good factions are approaching the factory, the Preachers from the left and Torchwood from the right.   The Daleks are advancing along the street on the left.  I was short 2 players so dropped 2 other factions (Police and Geezers).


Dalek Caan is picking off humans as the opportunity presents itself.  A dead Preacher is in the bottom left corner.


Inside the factory, 2 Cyberman (1 converted from a human captive) defend the 3 cyberconversion machines from Torchwood and the Preachers.  The Cybermen had a rough game, they often avoided being killed due to their armor but rolled terribly on their attacks.


A street view outside the factory.  A dead Cyberman lies in the street, killed while taking a captive to be converted.


Dalek Caan moves to capture the Doctor.


The last Cyberman vs. a Torchwood trooper and Rose Tyler.


The other humans are going after the Dalek.


Just as the last Preacher (Mickey Smith) got in range of Dalek Caan, an event card brought Dalek Sec in the game.  He only stayed for 1 turn, and I don't seem to have gotten a picture with him on the board.  His assistance turned the tide in favor of the Daleks.


End of the game.  The Cybermen are all dead, but the Daleks have captured the Doctor and exterminated all their nearby opponents.  Doubtless the Doctor will devise a cunning plan to escape and defeat the Daleks in the next episode!

I had a good time running the game.  I plan on running it again in June at StormCon, a new convention in Charleston, South Carolina.  I may make a few changes to the terrain, including adding some signs to the buildings and perhaps altering the color of the boards/sidewalks.  When I get the buildings out of storage I will take some individual pictures of them.

Thanks for looking!
Jason